Skip to content

Category: SharePoint

How to Index PDF Files with SharePoint Foundation 2010

SharePoint uses iFilters to index its files. Filters for most common file types are included out of the box with most versions of SharePoint. The big notable exception is an iFilter for PDF files. This is because Adobe won’t let Microsoft redistribute any of their code. It’s so bad that Microsoft can’t even include a PDF icon with SharePoint, you have to go out, download it, and set it up yourself. This has been true since the early days of SharePoint.

One of the things that you must do when you configure SharePoint to index PDF files is that you must tell the indexer that PDF is a valid file type. That’s easy enough to do from within the Shared Service Provider (for 2007) or the Search Service Application (for 2010), but the free versions of SharePoint, WSS and SharePoint Foundation don’t come with these tools.

It has always been possible to do this with WSS with a little bit of registry editing (and it’s supported by Microsoft), but that’s no longer true with SharePoint Foundation. That hack just doesn’t work with it. So what’s the answer? Well, as it turns out, the solution isn’t just adequate, it’s quite a bit better. The solution is to Install Search Server Express 2010.

Search Server Express is pretty simply a (only slightly) scaled back version of the Search Service applications that you get when you install SharePoint Server 2010. They are virtually the same architecturally and you get many of the features that you get with Server 2010. You also get a few other SharePoint Service applications, most notably, the Secure Store Service. And if you’re a Foundation user,it aligns up with your licensing agreement because it’s free.

So essentially,you get a much better search engine, with more capability for free. I can’t see a down side here. You don’t already need Foundation installed to install SSE, so in the future, whenever called upon to install SharePoint Foundation, I’ll be going straight to Search Server Express.

6 Comments

Office Web Applications Installation Issues–Be VERY Careful

I’ve recently had a few issues with Office Web Applications (the other OWA). I’m of course referring to the versions that run on SharePoint. In all cases, the typical installation routine is to lay down the SharePoint code (either Server or Foundation), configure the farm with the Products configuration wizard, then install the Web Apps and run through the Wizard again. There are variations on this, and you can use Powershell instead, but in all cases, you need to run through the configuration wizard after you lay down the Office Web Apps code.

The problem arises when you start uninstalling stuff.

In the first case, I was working with an Enterprise farm, and I needed to uninstall the SharePoint bits completely, so I would then remove the server from the farm, uninstall the bits, and then re-join it. So I went ahead and did that,but hit a rather nasty error when I tried to reinstall the SharePoint bits – “The install in progress conflicts with a previous installed MS Office 2010 Server Product.”. It turns out that it was the Office Web Apps Installation that I hadn’t removed first.

No problem,right? I’ll just uninstall the Web apps and all will be good. Unfortunately, no. I went to Control Panel, Selected the Office Web Apps, selected Uninstall and got an error stating that Office Web Apps had already been uninstalled, and would I like to remove it from the list. Not cool. I eventually had to resort to hacking through the registry and removing references to the apps (it was a dev farm so no problem). The second time I did this (yes I know, fool me once shame on you….) I wound up having to re-stage the whole server.

So then logically, you should really make sure that if you’re going to uninstall the SharePoint bits, you need to be very careful that you remove the Office Web Apps beforehand (and run the Product Wizard).

This brings me to my next scenario. I was recently working for a client that had SharePoint Foundation installed, and wanted to search PDFs. It turns out that this isn’t possible with Foundation (it was in WSS with a registry setting), but you now need to install Search Server Express. No problem, it’s free, and it’s a better solution anyway. I downloaded it, and installed it, and guess what error I got? “The install in progress conflicts with a previous installed MS Office 2010 Server Product.”. Well, I’ve seen that one before. It didn’t take me long to figure out that Search Server Express doesn’t like installing on top of Office Web Applications.

This time, all I needed to do was to uninstall Office Web Apps. No problem, I uninstalled it from control panel and all looked good. I then ran the Products Wizard to make sure everything was going to be put back properly, and the first thing that it asked me was whether I wanted to create a new farm, or join an existing farm. Excuse Me?????

So here’s the other big thing to note. If you uninstall Office Web Apps, it will remove the server from the farm. It might have been nice to know that ahead of time. Luckily, it was a complete install, and I had all of the necessary credentials handy including the farm passphrase.

In case you’re wondering, yes, Office Web Apps went back on top of Search Server Express just fine.

So just to recap:

1. Never, ever, uninstall a SharePoint 2010 product is the Office Web Applications are installed

2. You can’t install Search Server Express on a server with Office Web Applications already installed (they can be installed after)

3. Removing the Office Web Applications removes the server from the SharePoint farm.

4 Comments

Integrating SharePoint On Premises With BPOS and Exchange Online: Part 1–Outbound

If you’ve ever set up a SharePoint Farm, you’ll know that one of the first things that you need to configure is Outgoing Email. The way that you typically do this is to specify the name of an Exchange (or any other SMTP server) in your organization, a from and reply to address, and you’re done. Occasionally there are problems because the Exchange (or other) server does not allow relaying, and that’s easily remedied with a quick server configuration.

If you’re using BPOS, you not only have Exchange online, but you have SharePoint online. Outgoing email is already automatically set up for you. Just set an email alert for yourself and your will receive an email when anything changes. However, what about organizations that have elected to use hosted Exchange or BPOS, but also still maintain an on-premises SharePoint farm?

The good news is that it can be done. The bad news is that it’s not as simple as before when everything was on premises. This article will attempt to walk through the required steps.

This example uses SharePoint 2010 but the same is true (I think) for SharePoint 2007.

1. Setup SharePoint Outgoing Mail

As before, go to Central Administration, navigate to system settings, and click the “Outgoing E-Mail Settings” link.

image

There are two major things to note here. Firstly,the Outbound SMTP server is NOT one of the Online Services servers. What is it? Well,it doesn’t exist yet – we’ll get to that in step 3. The reason for this is that to deliver mail to any of the Online Services servers, you need to authenticate, use SSL, and use a non standard SMTP port. Unless I’m missing something, I don’t see any of those options here. (You can find complete instructions on relaying messages to BPOS and Exchange Online here). What we therefore need to do is to set up our very own SMTP server that can relay these messages for us.

The other thing to take note of here is the “From address”. When working internally, this doesn’t normally matter, you can give it any old fake name and off it goes. This is not true here, if this email address is not valid online, mail will not be delivered. We will add this address later.

2. Update DNS

If you haven’t already done so, you’ll need to add DNS entries for the SMTP server that will use the same IP address as this SharePoint server. In this example I’m using an internal domain, but you’ll also want to add another one externally if you’ll be configuring incoming email. all that will matter is that it resolve to the same machine.

3. Add the SMTP Service

Complete instructions on how to do this (as well as configuring mail for SharePoint generally) here. I will therefore not go into any detail except to point out that if you’re running on Windows versions prior to 2008, the installation procedure is slightly different. The end result is pretty well the same. In fact, I don’t think that this feature has been updated in about 10 years, it still requires the IIS6 admin interface.

4. Add Proxy User to Online Services

Unless you want all of your automated emails appearing as if they originated with an actual user, you’ll want to use a proxy user. The down side is – you’re going to pay a license for this user. Of course, given the cost of hosted Exchange, that’s not a big deal, but it would be nice if this wasn’t required.

If you’re reading this because you have BPOS or Hosted Exchange, you already know how to do this, so I won’t spell it out here. Just remember that this user needs to be the same as that specified in the first step.

5. Configure the SMTP Service

Open up the “Internet Information Services (IIS) 6.0 Manager” from the administrative tools group on the server. You should see your server as a node – open the node, and you’ll see the SMTP server. If it’s not already started, start it. Then right click on the server and select properties. When the properties box comes up, select the delivery tab. It should appear like the following:

image

If you haven’t already guessed it, we will be using all 3 numbered buttons.

1 – Outbound Security:

image

This is where we enter the credentials for the proxy user. Exchange Online checks to see if the “From” user and the authenticated user are one and the same. If they’re not, it rejects the message, which is why we need to have the proxy user, and to be careful about the “From” field in step 1.

TLS encryption is basically SMTP’s way of saying SSL, so this screen covers that off as well.

2 – Outbound Connections

image

This is the screen where we get to specify the non standard SMTP port used by Exchange Online. Use 587.

3 – Advanced

image

I have no idea why this is any more advanced than either of the other two screens, but no matter. This is where you enter the Online Services SMTP server as a Smart Host. You can also enter a masquerade domain (the “real” mail domain), but it’s optional.

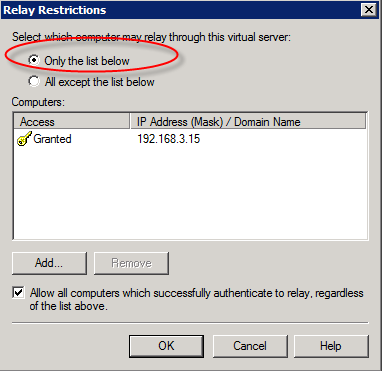
When you’re done, click OK. Then, click the access tab. Click the Authentication button to ensure that Anonymous  access is selected (it is by default). Then, click the relay button.

13 Comments

Configuring and Branding a Visual Web Part Solution for SharePoint 2010 With Visual Studio 2010

Although I originally saw the new Visual Studio Tools for SharePoint 2010 back in August 2009, this past week was the first opportunity that I was able to get down to business with them, working with a web part solution (I don’t get to develop as much as I’d like to these days…). The beauty of these tools is that they not only (finally) give you a true “F5” approach to developing SharePoint applications, but they also build out and deploy web part solutions automatically for you. Indeed, every run of your application goes through the packaging and deployment process.

Before I get into this, I want to say that to a jaded old SharePoint developer, these tools are like manna from heaven. Not only is ease of use greatly improved, but so is speed of deployment and debugging.

However, unless you want your feature to be named “Feature1” and your solution to be named “MySolution”, and you want your assembly to be named exactly the same as your project, you’ll want to brand your solution a bit. Renaming a project and/or a component file will do a certain amount of refactoring automatically for you, but it isn’t complete and there are a few gotchas. I thought that I’d outline a few of them,and walk you through a branding process. This example uses a Visual Basic project,and there will be differences with C#, but the concepts remain the same.

1. Create your Visual Web Part, and give it a name. In this case, the name will be “Hello World” (Original, huh?)

image

2. Next, change the Web part names from “VisualWebPart1” to your name, in this case “HelloWorld” (notice the lack of spaces). When asked to perform a rename of all references, select yes. Don’t get too excited, it only changes code references.

image

3. Then, do a search and replace (Ctl-H) on the entire solution, and replace “VisualWebPart1” with your name – in our case “HelloWorld”

image

It should find and replace 5 references (for a VB.NET project at least).

4. If you want to change the name of your assembly and/or root namespace, go to project properties and do so. In our case, the Assembly name will be changed from “Hello World” to “SecondFoundation.HelloWorld”, and the root namespace will be changed from “Hello_World” to “SecondFoundation.HelloWorld”.

image

5. Next, edit the SharePointProjectItem.spdata file. This is a hidden file and you’ll need to turn on the “Show All Files” option in the solution explorer. This file controls the auto generation of several project components.

image

In the SafeControl entry, you’ll find that the Namespace attribute reflects the original name of the assembly. You’ll need to update it to reflect your change:

image

6. Next, edit your xxxx.webpart file (in our case HelloWorld.webpart). You’ll need to change the name attribute of the type entry in the <metaData> section to reflect your changes. While you’re at it, you should likely change the Title and Description properties to something meaningful, although this isn’t required.

image

7. You’ll need to edit your xxxxxxUserControl.ascx file (in our Case HelloWorldUserControl.ascx) and change the Inherits attribute from the Control entry (the last line) to reflect the namespace changes.

image

8. Optionally, edit the Elements.xml file, and change the Group property to something meaningful.

image

9. Open up the Features section in the Solution Explorer, and change the name from Feature1 to something meaningful. In our case, to continue on with my highly creative theme, we’ll call it HelloWorld.

image

10. Finally, Edit your .ascx file and add some content to allow us to see the web part on the page. I’ll leave it to you to guess what content I’m adding…..

Run your project, and add your new web part to the page that pops up. All should be well.

image

This should get you going with creating non-generic web parts. Enjoy.

1 Comment

Reporting Services Error After Creating a SharePoint Site

I ran into a nasty little problem at a client site this morning. I had just finished setting up Reporting Services on a SharePoint Foundation front end server and everything was working just fine. The client had asked for a central site to store reports by default, so I of course created a new blank subsite called Reports (creative, right?). However, immediately after the site was created, I got this error:

“This operation is not supported on a report server that is configured to run in SharePoint integrated mode. (rsOperationNotSupportedSharePointMode)”

Huh?

That’s a reporting Services error – why am I getting this from SharePoint? Of course I wasn’t. When I had configured Reporting Services, I had also configured the Virtual Directories for the Reporting Services web services, and for the Report Manager, which is unused in Integrated mode. I allowed the default values for both to be used, which are ReportServer and Reports respectively.

That was of course my problem http://servername/Reports was already a valid URL so instead of going to my newly created site, it tried to access the Reporting Services URL, which doesn’t work in integrated mode.

Fixing this was a little bit tricky. The first part was easy, create a site that isn’t named either Reports or ReportServer,and set it up. The tricky part was deleting a site that I couldn’t navigate to. It would be easy with Server,but this was Foundation. SharePoint designer did the trick nicely. With a site open, you can manipulate sites one level down, and I was able to delete the offending site.

The moral of the story? Be aware of existing virtual directory names when creating subsites on the same server.

2 Comments